 DE
DE  BG
BG  IT
IT  GR
GR 

Score Board PC Software
This program is built to operate all of the Rousis Systems score boards and timers.
To begin setup run the installation file "ScoreBoard_SetUp.exe" that can be downloaded from our site at: http://www.rousis.gr/index.php/en/downloadsuk.
Follow the installation instructions and finally find and open the program "ScoreBoard.exe" from "program files".
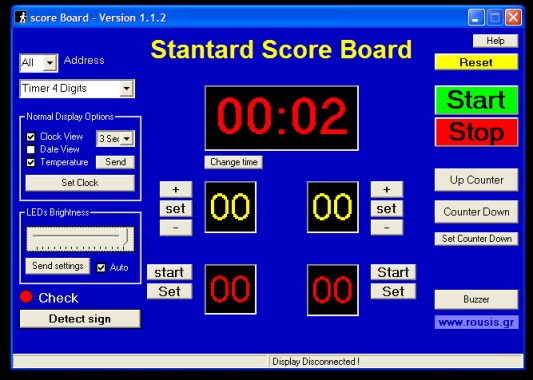
The main and unique form of the program will appear on your screen as you see in the picture above.
Then connect the panel through the terminal box with a USB plug at one of the free ports on your computer. Then click "detect Sign" and watch the messages in the status bars at the bottom of the form of the program. On the left you should see the USB terminal feature "USB device ROUSIS LED / 00000001" and on the right the message "Standard Score Board Connected". When you see these messages then the panel is connected and ready to operate.
Options and commands on the left side of the form:
- Above left is the panel's address choice "Address". Set the address of the panel you want to control or select "All" to connect to all panels that are connected to your PC.
- The next option under the "Address"option is the type of panel that is connected. This option works automatically if the panel has been recognized by the program.
- Immediately after are the brightness options "LEDs Brightness". The two options are: Fixed brightness chosen from the bar that exists in this context or automatically adjustable brightness ticking over "Auto". After selecting one of theese two press "Send settings" to send this configuration to the panel.
- Below is the button "Detect Sign".Clicking over that, we check if there is a linked panel,as mentioned in the beginning.
Options on the right side of the form:
- The "Help" button contains information about the client version.
- The "Reset" button is used to restart the the panel's program, stopping any operation performed.
- The "Start" green button starts the timing after a choice of "Up counter" or "Counter Down". Also starts the timing again after a freeze on the button "Stop".
- "Stop" button freezes time during a timing.
- The "Up counter" button starts the process starting from 0 (the timing starts immediately after pressing "Start").
- The "Counter Down" button begins the process of reverse timing from the default to zero time (the timing starts immediately after pressing "Start").
- With the "Set Counter Down" button you can change the default time of the countdown timing.
- With the "Buzzer" button you can give the command to sound the buzzer of the panel without changing anything in its function (this feature does not exist in all panels, but only if requested).
Options and functions in the center of the form:
- Starting from above is the title of the panel that is connected, with yellow letters (this changes automatically when a panel is recognized) .
- Below is a monitor frame corresponding to the panel's timer. This monitor shows in real time what the panel's timer indicates.
- After that is the "Change Time" button.Clicking over it a dialog box opens that lets you change the value of the timer. This change can be done during a timing.
- The following features apply only to panels with time and score and not just timers.
- Below are two smaller monitors for score1 and score2 of the panel. Theese monitors show in real time the score indication of the panel.
- Left and right of the score monitors are three buttons for score changing. Press + or - to increase or decrease the score or press "Set" to retype the number in the score frame.
- Below are two more monitors for other indications such as "volleyball sets" or smaller timers.
- Right and left of theese two monitors, are two buttons for value changing.
{phocadocumentation view=navigation|type=pn}