 DE
DE  BG
BG  IT
IT  GR
GR 

Connect the power supply of the device to the network 220V 50Hz.
Attention! Ground connection is necessary for safety reasons. The power cable should be covered until the connection terminal, in a protective plastic tube or protected by other means when exposed to open air.
The device is intended for outdoor use and constructed to operate at low or high temperatures, rain and high humidity. Also the LEDs intensity and brightness reassures the good readability even in conditions of direct sunlight.
You have to pay attention to the temperature sensor and the it's appropriate placement. The sensor is metallic and cylindrical and connected to the device with cable 2.5 meters long. The metallic part should always be kept under shade, protected from rain and wind, in order for the indications to cprrespond in the external conditions and be precise.
You should also pay attention if there is a fluorescent lighting or neon lamp very close to the display. The electronic display should be electrically isolated from the neon sign as much as possible.
Οperation:
The LED sign can display time, date and temperature. Optionally, it can display humidity as well. If needed, we could also place a GPS receiver for the absolute and continuous synchronization of the local clock with the individual clock.
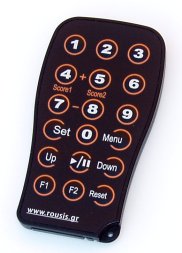
The operation can be done trough the infrared remote control. The range of the infrared remote control is about 10 meters with direction to the receiver. Attention! When the display is placed in direct sunlight, this range is reduced. The infrared receiver is located at the first digit at the top of the receiver. If the display is double-sided, it has an infrared receiver on both sides.
LEDs' luminance intensity varies in relation to the outdoor conditions thanks to a photoelectric sensor located on the display.
Attention: When the display is placed in direct sunlight the range is reduced.
If your display has a fluorescent lamp part then automatically, after the reduce of external lighting (at the evening), this part comes in operation.
SETTING AND HANDLING:
Clock Synchronization: At first, if the device does not have automatic radiosynchronism or GPS Receiver, the internal clock of the device should be properly set with the current exact time. To begin this process press SET by the remote control. Immediately the first digit from the left starts flashing. Enter the correct time (hours, minutes). Press SET button again and date starts flashing (day, month). After you enter the correct date press Set again and you can enter the year (you can set only the last two digits). Finally press SET once more to save all changes.Immediately, the display returns to normal operation. Do the same again when the Clock display needs synchronization (unless equipped with a GPS receiver).
|
Number
|
Time |
Date
|
Temp.
|
|
1
|
ON
|
OFF
|
OFF
|
|
2
|
OFF
|
ON
|
OFF
|
|
3
|
ON
|
ON
|
OFF
|
|
4
|
OFF
|
OFF
|
ON
|
|
5
|
ON
|
OFF
|
ON
|
|
6
|
OFF
|
ON
|
ON
|
|
7
|
ON
|
ON
|
ON
|
Menu options: You can select which information you wish to display by pressing MENU. F1 appears and one digit flashing. See the table below to select that digit. Each digit from 1 to 7 corresponds to a combination of appearances.
After that press MENU button again and F2 appears. you can select the switching information rhythm from 1 to 9 seconds (ie for how long the display will show each information).
The next two functions relate to the DCF and GPS receiver function. If there is not a DCF or GPS receiver you can skip this stage by pressing twice the MENU button to return to normal operation.
GPS indications: In the first two of these indications, right after F2, "P" is displayed and a two-digit number. This indication shows how many days (24 hours) have passed since the last update of your local clock from the transmitter of the DCF in Frankfurt, Germany.This is a function which is no longer in use,so you can skip that by pressing MENU once more.The next indication that appears is "B" and a two-digit number. This figure indicates whether there is a continuous and good reception of data from the DCF or GPS receiver. If the reception is good this number will be growing at a rate of one second, as the rate of data transmission by DCF or GPS Transmitter is one bit per second.
To get signal reception as good as possible, watch the following:
The receiver should not be placed near power cables or even near other electrical appliances. The distance must be over 20 - 30 cm. Try several places to find a proper one, while observing if the reception is good in "B" Menu.
These properties listed above do not apply to GPS sync receivers, because in this case things are rather easier since the basic requirement is for the receiver to have a visual contact with the sky.
Default Time Counter Down: Press F1 button to preset the reverse countdown time. Appearance and setting are arranged sequentially. Firstly hours then minutes. After typing 6 consecutive numbers, press F1 again to register the settings in the permanent memory. Whenever you wish you may change the countdown timer.
Timing Mode: In total, there are 2 ways of timekeeping:
Up Counter - Normal timer which starts with the Up button.
Counter Down - Reverse countdown which starts with the default starting time by pressing the Down button.
Timer starts only when you press PLAY / PAUSE button. Also you can stop (freeze) time and go back to the timer by pressing the same button. At each stop or start or end of the timer the alarm sounds (buzzer).You should know that time starts ticking when the buzzer stops and finishes when the buzzer sounds again.
Reset:
If, for any reason, you wish to reset (reboot) the LED display you can do that by pressing the Reset button on the remote control. If during the setup for some reason you want to cancel the process also press Reset.
Instructions for long distance REMOTE CONTROL:
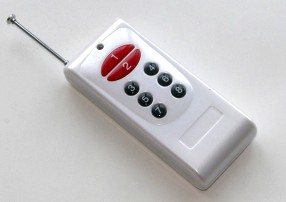 If you use the RF long distance remote control, the corresponding keys are:
The key 1: It is the start of the time counter (Start) or freeze the time (Pause).
Button 2: Reset / restart device
The button 7: Up Counter / Normal Time
The button 8: Counter Down / Reverse clocking